A home golf simulator is made up of six parts working together:
Get the room and the layout right first, and every other purchase falls into place. Get them wrong, and even good equipment will disappoint. This guide walks through the build in the order that avoids expensive rework.
Ceiling height is the dimension you usually cannot change, so check it first. Measure floor to ceiling at the exact spot where you will stand, not at the room's highest point. Ducts, beams, joists and light fixtures all cut into real clearance, and so does the hitting mat itself, which can raise you a couple of inches.
Refer to the following table for guidelines on how much space you should have to get started.
| Dimension | Minimum | Comfortable | Ideal |
|---|---|---|---|
| Ceiling height | 9 ft (2.7 m) | 10 ft (3.0 m) | 10–12 ft (3.0–3.7 m) |
| Room width | 10 ft (3.0 m) | 12–14 ft (3.7–4.3 m) | 15–16 ft (4.6–4.9 m) |
| Room depth | 15 ft (4.6 m) | 16–18 ft (4.9–5.5 m) | 18–20 ft (5.5–6.1 m) |
At 9 feet most golfers can swing irons and wedges comfortably. A 10-foot ceiling opens up full driver swings for most players. Below 9 feet you are looking at a short-game practice station rather than a full simulator, which is still useful, but it is a different project. Before committing to a room, stand on something the height of a hitting mat, take your driver, and make slow practice swings, including the follow-through. If left-handed players will use the room, test both sides. A room that fits one right-handed golfer can still clip a wall on a left-handed backswing, and width is what fixes that: 14 feet or more covers both handednesses comfortably. Also consider whether players taller than you will be using the simulator, adjust the height requirements accordingly.
Launch monitors fall into two broad types, and the type you choose sets the room layout:
Check the maker's own placement specs for the unit you are considering and treat them as hard numbers: monitor placement is the one measurement that cannot be fudged after the screen is hung. Decide the monitor type first, and lay out the room around it. Follow this link for more information on choosing between radar vs. camera launch monitors.
Sketch the room from the screen wall backward, in this order:
Walk the layout with a club in hand before drilling anything. Check the door swing, the path to the seating, and where a topped or shanked ball could go. That walkthrough catches most layout mistakes while they are still fixable.
There are two main ways to secure the impact screen to the ceiling and/or frame.
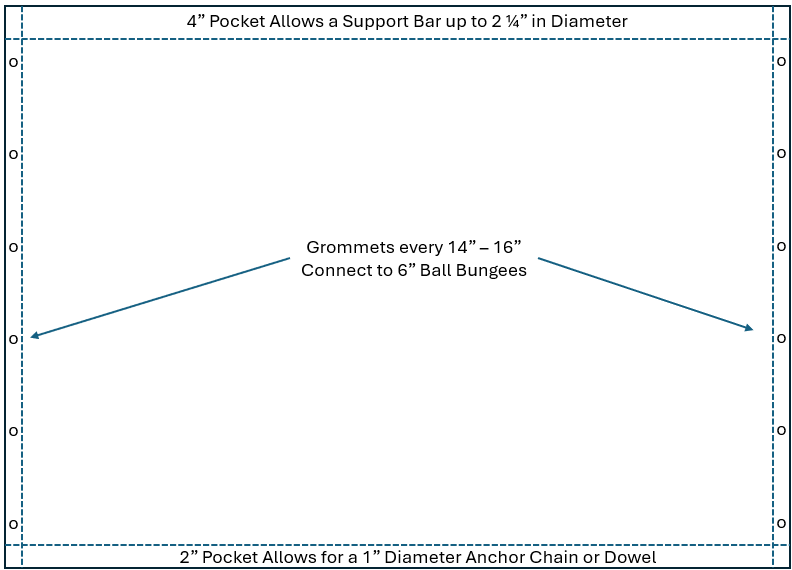
Pockets are often used on the top and bottom. These are sleeves or channels that run the entire width of the screen to allow it to be hung on a rod, much like a curtain. The benefit of an upper pocket is that it ensures even tension along the top to help keep the screen completely flat. The lower pocket can be used to insert a light chain or dowel, suspended just off the floor, to provide even tension along the bottom while permitting "give" when the ball is struck.
The pocket size is set by the length of material folded over, so the flat opening ends up about an inch less than the fold size, since about an inch of material is needed to complete the sewing. The fold size is usually about twice the diameter of the bar you plan to insert into the pocket. Follow this link to learn about Pocket Sizing. Normally, the lower pocket is smaller since it does not house a sturdy support bar like the upper pocket. Nevertheless, if you make the lower pocket the same size as the upper one, it gives you the option of rotating the screen by 180 degrees if you find that the lower portion wears faster. If you normally strike the screen near the centre, there may be no benefit to rotating it. If you elect to use pockets, you will need to decide whether you want to project onto the pockets. There is a slight seam on the inside edge of the pocket so this may interfere with the picture slightly, but the extreme upper and lower edges of the image don't tend to be too critical, so you might want to leverage this real estate as part of the projection surface.
Our golf mesh material comes in 120-inch widths. This generally means that one of your screen dimensions (width or length) cannot exceed 120". Pockets are normally formed by folding the material onto itself. This may reduce the maximum permitted screen height: each pocket takes its pocket size plus about an inch of sewing. For example, a 4" pocket on the top and a 3" pocket on the bottom would reduce the maximum screen size to 111". In exceptional cases, where the customer needs the full 120", we can sew pockets using extra screen material. Let us know if you need this adjustment to our standard process.
Grommets are usually used on the sides but can also be used on the top and/or bottom instead of pockets. If you use grommets along the top, you should have these spaced fairly tightly, say at least every foot or so. Grommets every 15" is generally sufficient for the sides. Normally, grommeted edges are not incorporated into the projection surface. We offer two different sizes of grommets; the smaller size makes them more discrete and is usually the best choice. Grommeted hems are 2" wide; these hems are generally not incorporated into the projection area.
Here we show a common golf screen configuration.
Sizing everything up can be tricky since you need to consider the available room size, projector specs, screen fasteners, etc. Before you start, use this Golf Simulator Room Calculator to help determine your recommended screen size and other key dimensions.
The enclosure is a frame plus side and top protection. This is generally a metal, lumber or plastic frame, sized to the screen. What matters is that it is rigid, square and level. Close the sides and top with netting or panels. For improved projection, make the enclosure solid black rather than open netting. Netting stops balls but lets light through; solid black side and top panels block stray light and reflections from the room, which visibly improves contrast and picture quality.
Size the screen to the wall, then check two numbers that are easy to confuse: the finished size and the viewing area. The finished size is the full fabric including hems, pockets and/or grommets; the viewing area is the part that shows the picture. Plan the projected image for the viewing area and order by finished size.
Size the viewing area to your projector's aspect ratio, not just to the wall. A projector's native ratio (16:9 on most home units, but also 16:10 and 4:3) fixes the shape of the image: width equals height times the ratio. In most rooms the ceiling sets the height, so work from the height you have. With 8-foot ceilings and a 16:9 projector, an 8-foot-tall image is 14 feet 3 inches wide, and the viewing area should be that size, so the picture fills it edge to edge. If the screen's ratio does not match the projector's, you get black bars on unused screen or a cropped image. This is where made-to-measure matters: a fixed-size screen comes in its own ratio and cannot be configured to yours, while a custom screen can be built to the projector's exact ratio. Keep in mind that the raw material is 120 inches wide, so the finished size in one direction is at most 120 inches, less the pocket and sewing allowances in Step 4 and 2 inches for each grommet hem.
Hang the screen on a three-part system that tensions it evenly while permitting give where the ball lands. Along the top, we recommend ordering a 4-inch pocket (sleeve). This can be slipped over a bar or pole up to 2 1/4 inches in diameter. Suspending the full width from one bar tensions the top uniformly, which is what keeps the image square; allow for the expanded pocket drawing the screen up by about an inch once it is on the bar. Low-cost bars can be purchased as steel chain-link fence top rail or PVC conduit. The ends of the bar can be supported from the ceiling, or they can connect to the side frames. Be sure to purchase a bar that is longer than the screen is wide to allow for mounting hardware. The bar may need to be supported in the middle to prevent sagging, you can run a small wire through the screen or drill a hole through the top and screw in a hook or eye lag screw. You will want to pick up the piping from your local Home Depot or other building supply store, since shipping long piping can be expensive.
Support the sides using grommets tied into a vertical frame secured to the floor and ceiling or back wall. Where possible, you will want to screw the frame into studs and trusses. If these don't align with where you want your frame, you may need to straddle strapping across adjacent studs and connect the sides of the screen frame to the strapping. Size the frame opening 3 - 6 inches wider per side than the screen's finished size. Hang the sides using 6-inch white ball bungees adjusting the length according to the gap between the screen and the frame. Don't use bungees that are too thick or rigid since you want the force of the ball hitting the screen to be able to flex the bungees. The bungees do two jobs: they pull the fabric flat so the image stays true, and they give when the ball hits, absorbing energy instead of passing it straight into the frame. If the bungee is too short, tight or stiff, the screen will not yield on impact. If room width forces a narrower gap, route the bungees diagonally — attach each cord above and below its grommet rather than straight across — to recover cord length without widening the frame. Keep at least 12 inches clear behind the screen; that is the gap that actually limits how far the centre can flex back on a struck ball. Cover a wide side gap with pads or netting so a mishit cannot escape through the slot.
Along the bottom, add a 2 to 3-inch pocket with a chain or light bar or dowel inside it. The weight pulls the screen taut, while the pocket and bungees still let it give when struck. Tension the screen flat, but not drum-tight. A drum-tight screen stops the ball over a very short distance, which raises peak friction heating and wear at the impact point, and sends more rebound back toward the golfer. Flat with give is the target; a little movement on impact is normal and healthy.
 Hang black material a few inches behind the screen. It blocks light bleed
from behind and deepens the projected colour. We recommend the
black sheet behind standard Golf Mesh and HD Golf Mesh; on three-ply HD
Golf Mesh it is optional, since the three-ply material is more opaque on
its own.
Rolls of black felt roof underlay can be purchased at Home Depot or other building suppliers for about $35. These can be cut into strips which are stapled to a 2x4 running behind your screen as depicted here. This is a very cost-effective way to improve the picture quality.
Level the floor first. A mat on an uneven floor rocks, and a rocking mat changes the ball position between shots, which no launch monitor can correct for. Subfloor panels or a plywood platform fix most rough garage and basement floors. Then set the hitting mat flush with the surrounding turf so your feet and the ball sit at the same height, the way they do on a course. Remember the mat height in the ceiling math from Step 1: it counts.
Projector placement is one calculation plus one rule. The calculation is the throw ratio: projector-to-screen distance divided by image width. A projector with a 0.8 throw ratio placed 8 feet from the screen makes a 10-foot-wide image. Work backward from your screen's viewing width: divide the distance where you plan to mount by the viewing width, and buy a projector whose throw ratio range covers the result. Home simulator projectors typically run from about 0.5 (very short throw) to around 0.9; tighter rooms need the shorter end of that range.
The rule: mount the projector high, on the ceiling above or slightly behind the hitting area, with its distance from the screen set by the throw ratio above. You want to ensure that the golfer does not cast a shadow onto the screen. Shadows come down to height and distance. What puts a shadow on the screen is a projector that is low and far back: then you stand between the light and the screen at an angle that throws your shadow onto the screen. A projector mounted high throws that same shadow onto the floor in front of the screen instead, where it does no harm. So keep the projector as high as the ceiling allows, and don't push it farther back than the throw ratio requires. Prefer lens shift over keystone correction: lens shift moves the image optically with no loss, while keystone rescales it digitally and costs brightness and sharpness. Test the projected image on the hung screen at address and through a full swing — including the top of the backswing, when the club is high and behind you — before fixing the mount permanently; moving a mount is easy, moving it after the cables are run is not.
On brightness, 3,000 lumens is the floor for a dark room, and 4,000 or more if the room has any ambient light. On aspect ratio, the screen should already be sized to the projector's ratio from Step 4: a 16:9 projector on a 4:3 screen must throw a wider image to fill the height, which changes the throw distance math above. Decide the screen shape and the projector together, not separately. To help with all of these calculations, be sure to check out the room calculator linked to in Step 4, above.
Every light in the room should be judged by one test: does any of it fall on the screen? Light on the screen washes out the image faster than any projector upgrade can recover. Use dimmable, indirect lighting aimed away from the screen wall, black out windows, and keep the walls around the screen dark. You need enough light to see the ball and move safely; you do not need the room lit like a living room.
Put the computer close to the bay: a short, reliable video cable to the projector beats a long one, and the launch monitor usually wants a wired connection too. Plan power for the projector, the monitor and the computer before the frame goes up, so cables run behind panels instead of across the floor. Leave ventilation around the computer; a sim PC under load in an enclosed bay runs hot. Simulator software is a separate purchase from the hardware in most setups, so check that the software you want supports your monitor type before buying either.
Install the monitor to its maker's placement specs — the numbers you worked from in Step 2 — and treat them as exact. An overhead camera unit mounts to the ceiling above the hitting area, with a clear view of the ball and clear of every swing path. A side camera unit mounts beside the bay at the specified height and distance, square to the target line. A radar unit sits behind the ball at its specified distance, with an unobstructed line of sight to the ball and the screen. In all three cases, level the unit and align it to the target line: a monitor that is skewed to the line reads every shot skewed. Keep the unit itself out of the ball flight path, and where a mishit could reach it, shield it with netting or a panel that does not block its view. Run power and data cables before you finalize the position, and keep cables out of the swing area and off the floor where feet travel.
Follow the monitor maker's calibration routine, then run a safety pass before regular play. Swing the longest club with a full follow-through in every handedness the room will see, and check clearance to ceiling, walls, projector and lights. Then hit a few real balls and watch three things: the ball's behaviour off the screen (it should drop, not rocket back), the side netting on shanks, and whether any ball reaches past the enclosure. Fix what fails now. A room that passes this check is a room you can relax in.
What is the smallest room that works?
About 10 feet wide, 15 feet deep, and 9 feet high will run a simulator,
but expect compromises: mostly irons, one handedness, and a tight projector
position. The comfortable target is 12–14 feet wide, 16–18 feet deep, and
10 feet high.
Garage or basement?
Either works. Garages usually win on ceiling height and depth; basements
usually win on darkness and temperature control. In both cases, ceiling
height is the deciding factor, so measure it first.
Can I use a net instead of an impact screen?
A net stops balls, but it cannot show the projected image, so it is a
practice station, not a simulator. If the goal is playing simulated
courses, the impact screen is the part that makes it a simulator.
How long does an impact screen last?
This depends on many factors including:
Most customers get several years out of our screens when playing normal 18-hole games. Premature wear tends to happen when customers practice a lot of wedge or chip shots, resulting in high-speed spin and travel when the ball hits the screen. We recommend hanging a sheet or large towel in front of the strike zone if you want to focus on practicing your short game.
Order a custom screen in the size your layout calls for, sized to your projector's aspect ratio. Use the Golf Simulator Room Calculator to confirm the finished size before you order, then order a custom impact screen to your exact size.
